| Nous nous efforçons de localiser notre site Web dans le plus grand nombre de langues possible, mais cette page est actuellement traduite par Google Traduction. | étroit |
-
-
produits
-
ressources
-
support
-
société
-
Connexion
-
ReviverSoft
Answers
Obtenez des réponses de notre
Communauté d'experts informatiques-
Accueil
-
Ressources
-
Questions & Réponses
- Impression d'un document Word et PDF, mais du papier vierge sortant de mon imprimante hp.
Impression d'un document Word et PDF, mais du papier vierge sortant de mon imprimante hp.
 j'aime cette question0 Cliquez sur "Aimer"SuivezÇa n'est jamais arrivé auparavant. J’ai essayé aujourd’hui d’atteindre le support HP et d’obtenir le lien vers ce site. S'il vous plaît aidez-moi comme je l'ai acheté il y a 4 mois seulement.Système d'exploitation:Windows 10Répondez à cette questionmeilleure réponseSalut jason
L’imprimante fonctionne mais il manque de l’encre noire ou de couleur dans la sortie imprimée ou encore une page vierge ou très peu d’encre.Pour résoudre ce problème, utilisez uniquement des cartouches HP authentiques. De plus, vous pouvez retirer la cartouche noire pour n'imprimer qu'avec la cartouche 3 couleurs, remplacer toutes les cartouches vides ou défectueuses ou nettoyer la tête d'impression.
Solution 1: utilisez des cartouches HP authentiquesHP vous recommande d'utiliser des cartouches d'encre ou de toner HP authentiques. HP ne peut garantir la qualité ni la fiabilité des cartouches non HP ou des cartouches rechargées. Si vous n'utilisez pas de cartouches HP authentiques, il est possible que les étapes décrites dans ce document ne résolvent pas le problème. Pour vérifier l'authenticité de vos cartouches, rendez-vous sur hp.com/go/anticounterfeit .Achetez des cartouches de remplacement et d’autres fournitures auprès du HP Store ou des revendeurs locaux.Suivez ces étapes pour vérifier les niveaux d'encre, puis remplacez les cartouches faibles ou vides.
Solution 2: vérifiez les niveaux d'encre estimés, puis remplacez les cartouches faibles ou vides.Étape 1: Vérifiez les niveaux d'encre estimés
Suivez ces étapes pour vérifier les niveaux d'encre estimés.REMARQUE:
Les avertissements et indicateurs de niveau d'encre fournissent des estimations à des fins de planification uniquement. Lorsqu'un indicateur indique un faible niveau d'encre, envisagez de disposer d'une cartouche d'encre de remplacement afin d'éviter tout retard d'impression. Vous n'avez pas besoin de remplacer les cartouches d'encre jusqu'à ce que la qualité d'impression devienne inacceptable.- Chargez du papier blanc ordinaire dans le bac à papier.
- Touchez le bouton (
 ) à côté de l’icône Configuration (
  ) dans le coin inférieur gauche du panneau de commande.
 - Touchez le bouton Flèche Droite (
 ) pour sélectionner Outils, puis touchez OK.
 - Touchez le bouton Flèche Droite (
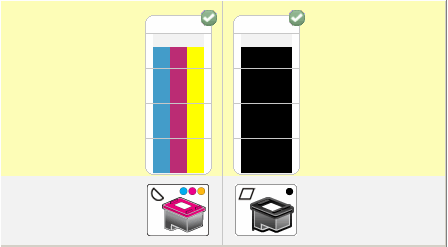
 ) pour sélectionner Niveaux d’encre estimés, puis appuyez sur OK. Figure: Graphique du niveau d'encre estimé indiquant les cartouches pleines.
- Si aucune des cartouches d'encre n'est à court d'encre , vous n'avez pas encore besoin de les remplacer. Continuer à la solution suivante.
- Si l'une des cartouches d'encre est presque vide, passez à l'étape suivante pour les remplacer.
Étape 2: remplacez les cartouches faibles ou vides
Suivez ces étapes pour remplacer les cartouches faibles ou vides.- Chargez du papier blanc ordinaire dans le bac d'alimentation.
- Appuyez sur le bouton d'alimentation pour allumer l'imprimante.
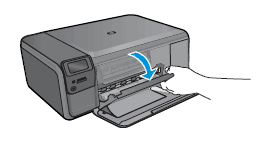
- Ouvrez la porte de la cartouche. Attendez que l'imprimante soit inactive et silencieuse avant de continuer. Figure: Ouvrez la porte d'accès aux cartouches

- Appuyez légèrement sur la cartouche pour la libérer, puis retirez-la pour la retirer de son logement. Figure: Retirez la cartouche

ATTENTION: ne touchez pas les contacts cuivrés ni les buses d'encre. Aussi, ne re-scotchez pas les cartouches. Cela pourrait entraîner des obstructions, une défaillance de l'encre et de mauvaises connexions électriques.
Figure: Ne touchez pas les contacts ni les buses
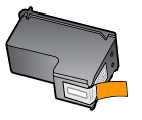
- Retirez la nouvelle cartouche de son emballage, puis tirez sur la languette pour retirer le ruban adhésif.
ATTENTION: ne touchez pas les contacts cuivrés ni les buses d'encre. Aussi, ne re-scotchez pas les cartouches. Cela pourrait entraîner des obstructions, une défaillance de l'encre et de mauvaises connexions électriques.
Figure: Retirez le ruban adhésif Tenez la cartouche par les côtés avec les buses orientées vers l'imprimante, puis insérez la cartouche dans son logement de couleur différente jusqu'à ce qu'elle s'enclenche. Assurez-vous que l’icône de la cartouche correspond à celle de la fente.
 - Insérez la cartouche tricolore dans le logement de gauche.
- Insérez la cartouche noire dans la fente à droite.
- Poussez la cartouche dans son emplacement jusqu'à ce qu'elle s'enclenche.
- Répétez ces étapes pour remplacer l’autre cartouche, si nécessaire.
- Fermez la porte de la cartouche.
- Assurez-vous que l’imprimante est allumée et que le papier est chargé.
- Touchez le bouton (
 ) à côté de l’icône Configuration (
  ) dans le coin inférieur gauche du panneau de commande.
 - Touchez le bouton Flèche Droite (
 ) pour sélectionner Outils, puis touchez OK.
 - Touchez le bouton Flèche Droite (
 ) pour sélectionner Aligner l'imprimante, puis appuyez sur OK. L'imprimante imprime une page d'alignement.
 - Soulevez le couvercle de l'imprimante.
- Placez la page d’alignement, côté imprimé vers le bas, dans le coin avant droit de la vitre du scanner. Reportez-vous au guide gravé situé à côté de la vitre du scanner pour obtenir de l'aide sur le chargement de la page d'alignement.
- Fermez le couvercle, puis appuyez sur OK pour terminer l’alignement.
- Patientez pendant que l'imprimante numérise la feuille d'alignement et termine le processus d'alignement.
Étape 3: Alignez l'imprimante
Suivez les étapes ci-dessous pour aligner les cartouches.Solution 3: utilisez un outil automatisé pour nettoyer la tête d'impression.
Si vous rencontrez des problèmes d’impression, la tête d’impression risque d’être obstruée. Suivez ces étapes pour exécuter un outil automatisé de nettoyage de la tête d'impression.- Chargez du papier blanc ordinaire dans le bac d'alimentation.
- Touchez le bouton (
 ) à côté de l’icône Configuration (
  ) dans le coin inférieur gauche du panneau de commande.
 - Touchez le bouton Flèche Droite (
 ) pour sélectionner Outils, puis touchez OK.
 - Touchez le bouton Flèche Droite (
 ) pour sélectionner Nettoyer la tête d’impression, puis appuyez sur OK. L'imprimante commence le processus de nettoyage.
 REMARQUE: les bruits mécaniques pendant le processus de nettoyage sont normaux. Une page de test s'imprime à la fin du processus de nettoyage.
- Vérifiez la qualité d'impression sur la page de test de la tête d'impression. Si la qualité d'impression n'est toujours pas acceptable, suivez les instructions pour effectuer un nettoyage de deuxième niveau. Vous devrez peut-être nettoyer la tête d'impression plusieurs fois pour rétablir une qualité d'impression optimale.
Solution de contournement: imprimer en mode de sauvegarde
Si vous devez imprimer immédiatement et que la qualité des impressions ne vous pose pas de problème, vous pouvez imprimer en mode sauvegarde.Si vous n'avez pas de cartouche de remplacement, vous pouvez toujours imprimer en mode de sauvegarde de l'encre. Retirez simplement la cartouche posant problème et imprimez avec la cartouche restante.- Si vous retirez la cartouche 3 couleurs, les impressions seront en niveaux de gris.
- Si vous retirez la cartouche noire ou photo, le produit imprime lentement et les couleurs imprimées peuvent être différentes.
Cordialement,
Lokesh
- 1 Réponse
Le plus ancien
Les plus récents
Votes
Il n'y a pas encore de réponses.
Bienvenue dans Reviversoft Answers
Réponses ReviverSoft est un endroit idéal pour poser toute question que vous avez sur votre ordinateur et que vous avez répondu il par la communauté d'experts.Publiez votre question
Posez votre question à la communauté maintenantQuestions similaires
Problemet skjedde pour noen minuterie siden, Etter à JEG hadde jobbet med filen. Filen er på ca 13 sider. Hadde akkurat lagret filen og krysset ut mot. "Insérer un fichier" Skulle sende filen sur la poste, les hommes da jeg trykket i Hotmail, fant jeg ikke filen. Kan ikke finne den noen plass, hverken med projecteurs eller i Finder. Ser ikke ut som den ligger på min mac i det hele tatt.Visionnez réponses9Montrez la question complèteне съм забелязал да е свързано с инсталацията на програма.Прави ми го от скоро.Visionnez réponses2Montrez la question complèteTout d'abord, j'ai scanné avec Driver Reviver et il a trouvé deux dispositifs qui ont été nécessaires de mise à jour. Donc, j'ai mis à jour, installé et redémarré comme il dit. Après cela, je n'avais pas l'audio, je veux aller à un contrôle de volume et il dit que le problème de mélangeur. Je suis allé à exécuter les sevices ect et vérifié les propriétés, tous étaient comme il se doit. Aussi, quand je presse les touches supérieures HP (qui sont bleu) et d'essayer de régler le volume, il n'a pas augmenter ou diminuer il, aswell comme les autres boutons ne fonctionne pas.Visionnez réponses3Montrez la question complèteVous avez des problèmes avec votre PC?Effectuez une analyse PC gratuite à l'aide de Driver Reviver maintenant.TéléchargerCommencer l'analyse gratuiteSociété| Partenaires| EULA| Avis juridique| Ne pas vendre/partager mes informations| Gérer mes cookiesCopyright © 2026 Corel Corporation. Tous droits réservés. Conditions d'utilisation | Confidentialité | Cookies -
